Hardscape Installation Guides
We know new projects can be daunting but Sutherland’s is here for our customers.
Paver Installation Process
Step #1: Planning & Calculating
- Plan where your project will be and what the dimensions are. Measure the width and length of the area, then multiply the width by the length. The result gives you the square footage of the area to be paved. Once you have that information, it’s time to pick your pavers and the pattern you’ll follow.
Step #2: Excavate
- Unless your project involves overlaying existing concrete, typically the next step is to excavate the top layer of soil. The amount of soil excavated will depend on the type of project. You’ll want to allow enough room to install Road Base at a minimum depth of 4 inches, a 1 inch layer of sand for leveling, and room for your pavers which are typically 2 3/8 inches thick.
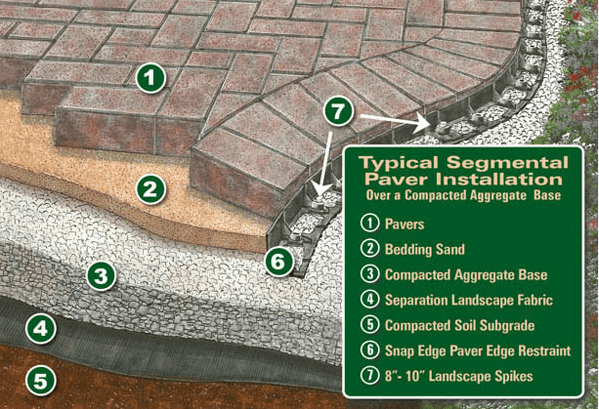
Step #3: Base
- The step after that is to install a layer of 3/4″ aggregate. We recommend Road Base and a minimum of 4″ depth. Not only does it allow for compaction but it also promotes structural integrity. Your pavers are likely to sink and shift over time if they lack a solid foundation of base and sand.
Step #4: Edge Restraint
- Install edge restraint using a concrete curb or aluminum edging using 10 inch nails to hold in place.
Step #5: Sand
- Once the base is in place, a layer of sand is added and leveled. Bedding sand should be 1 inch deep and spread evenly across the base material.
Step #6: Hardscape
- Now that your base is compacted and sand leveled, lay the pavers in the designed pattern that you have planned for. Theoretically, you should have the correct amount of pavers needed to complete your project.
Step #7: Interlocking
- Next you’ll want to sweep Polymeric Sand in between the joints of the pavers. This sand is recommended because the mixture of sand grains and additive particles forms a powerful binding agent that securely holds together concrete pavers and other hardscape materials, no other sealant is needed. Otherwise you could use a filler sand, decomposed granite, etc. and then apply a sealant. Allow the patio to dry according to the instructions on the bag of Polymeric Sand or sealant that you use.
*Whether you are using polymeric sand or a stabilizer, make sure to follow instructions thoroughly, to produce excellent results.
Wall Block Installation Process
Step #1: Excavate the Area
- The trench should be at least 12 inches wider than the block you are installing and 6 inches deeper than the height of one block.
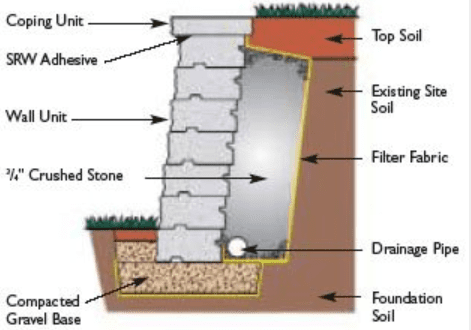
Step #2: Leveling Pad
- The next step is to install a layer of 3/4″ aggregate, such as Road Base, for the leveling pad. Not only does it allow for compaction but it also promotes structural integrity. Your blocks are likely to sink and shift over time if they lack a solid Road Base foundation. If the planned grade along the wall will change in elevation, the leveling pad may be stepped up in 6 inch increments to match the grade change. Start at the lowest level and work upward whenever possible. Lightly mist the area and then compact the aggregate and make sure it’s level front to back and side to side. Your pad should be a minimum of 6 inches deep after compaction.
Step #3: Base Course
- Begin laying block at the lowest elevation of the wall. Place the first block level, front to back and side to side. Lay subsequent blocks in the same manner, flush against each other. Make sure they are in full contact with the leveling pad. If the wall is on an incline, don’t slope the blocks, step them up so they remain consistently level. For multi-piece walls, use the largest unit (18 inches wide) for the base course. Complete the base course before proceeding to the second course. A drainage pipe should be placed at rear base of first course.
Step #4: Stacking and Filling
- Place the second course of blocks on top of the base course. Remember to keep the wall on bond by placing units in a staggered relationship to the course underneath. Pull each block forward as far as possible to ensure the correct setback.
- Backfill with drainage aggregate, such as our 3/4″ Gray Cobble, directly behind the block, adding 6 inchers at a time, followed by proper compaction. Add soil fill behind the aggregate. Compact before the next course is laid.
Step #5: Capping the Wall
- With the top units dry and clean, stack the caps on top of the final row and use a masonry construction adhesive to secure them.
FAQ
No, but we have a list of local contractors that we can suggest.
Anything that we stock in our yard does not need to be purchased in full pallets. Contact us to know what is considered a stocking item.
We can deliver pallets and offload them with our forklift to areas that are easily accessible (e.g. driveway, side street). If you’re unsure, give us a call and we will determine if it’s possible.
You can find different patterns on the Installation Guides drop down menu labeled Patterns